 TRADING FOUNDRY
Order Types — Market, Limit, Stop, and the Orders That Protect You.
Choose between market, limit and stop orders for any entry, attach a stop-loss and take-profit to every trade, and understand when slippage and gaps can change your fill.
You can have the best analysis in the world and still lose money on the mechanics. Beginners chase price with market orders at the worst moment, forget to attach a stop, or place a "stop" order thinking it is a "limit" and get filled in exactly the wrong direction. These are not trading mistakes so much as button mistakes. They are entirely avoidable.
This lesson covers the handful of order types you need, what each one does, and which to use when. It also covers the two orders that should accompany every single trade you ever place: the stop-loss and the take-profit.
Platforms name things slightly differently — "pending order", "entry order", "working order" — but the underlying types below are universal. Practise every one of them on a demo account before using them with real money.
Market orders: now, at the best available price
A market order buys or sells immediately at the best price available. Buy at market and you pay the current ask; sell at market and you receive the current bid.
Its strength is certainty of execution: you are in. Its weakness is uncertainty of price: in a fast market, the price you get may be worse than the price you saw when you clicked. That gap is slippage (Lesson 3).
Use market orders when your trigger has already happened and you want in now — for example, when an H1 signal candle has just closed and you are entering at the open of the next candle.
Limit orders: a better price, or nothing
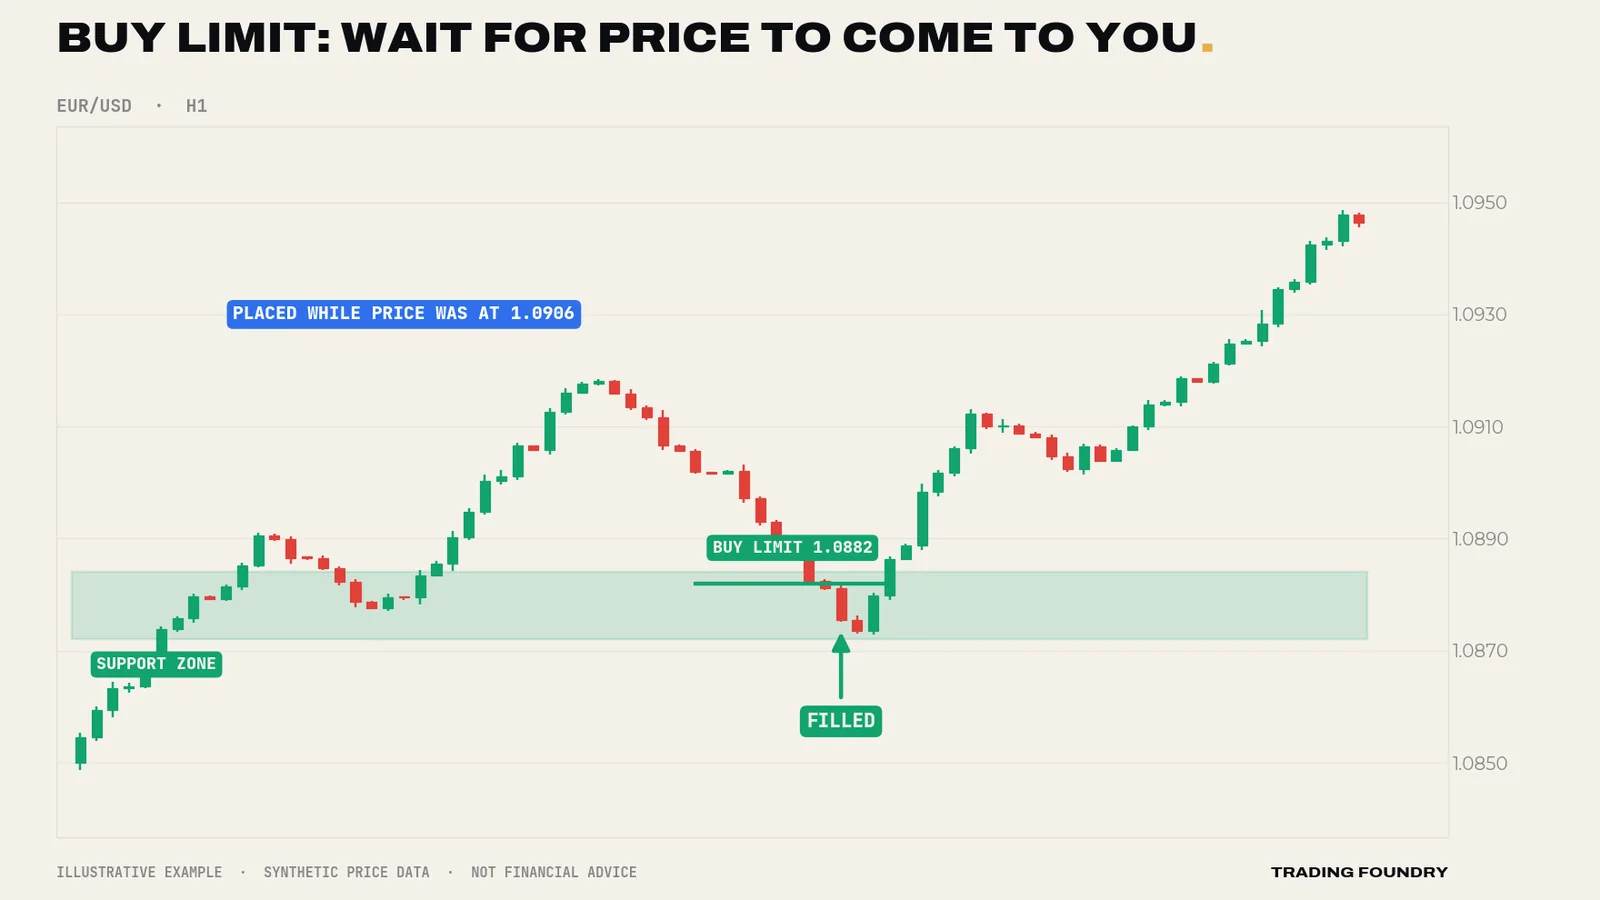
A limit order waits for price to come to you, at a price better than the current one.
- A buy limit sits below the current price. "Buy, but only if price falls to here."
- A sell limit sits above the current price. "Sell, but only if price rises to here."
Limit orders fill at your price or better, so there is no negative slippage on entry. The cost is that the order may never fill — price can turn just before reaching it, and the move happens without you.
Stop orders: only if price proves the move
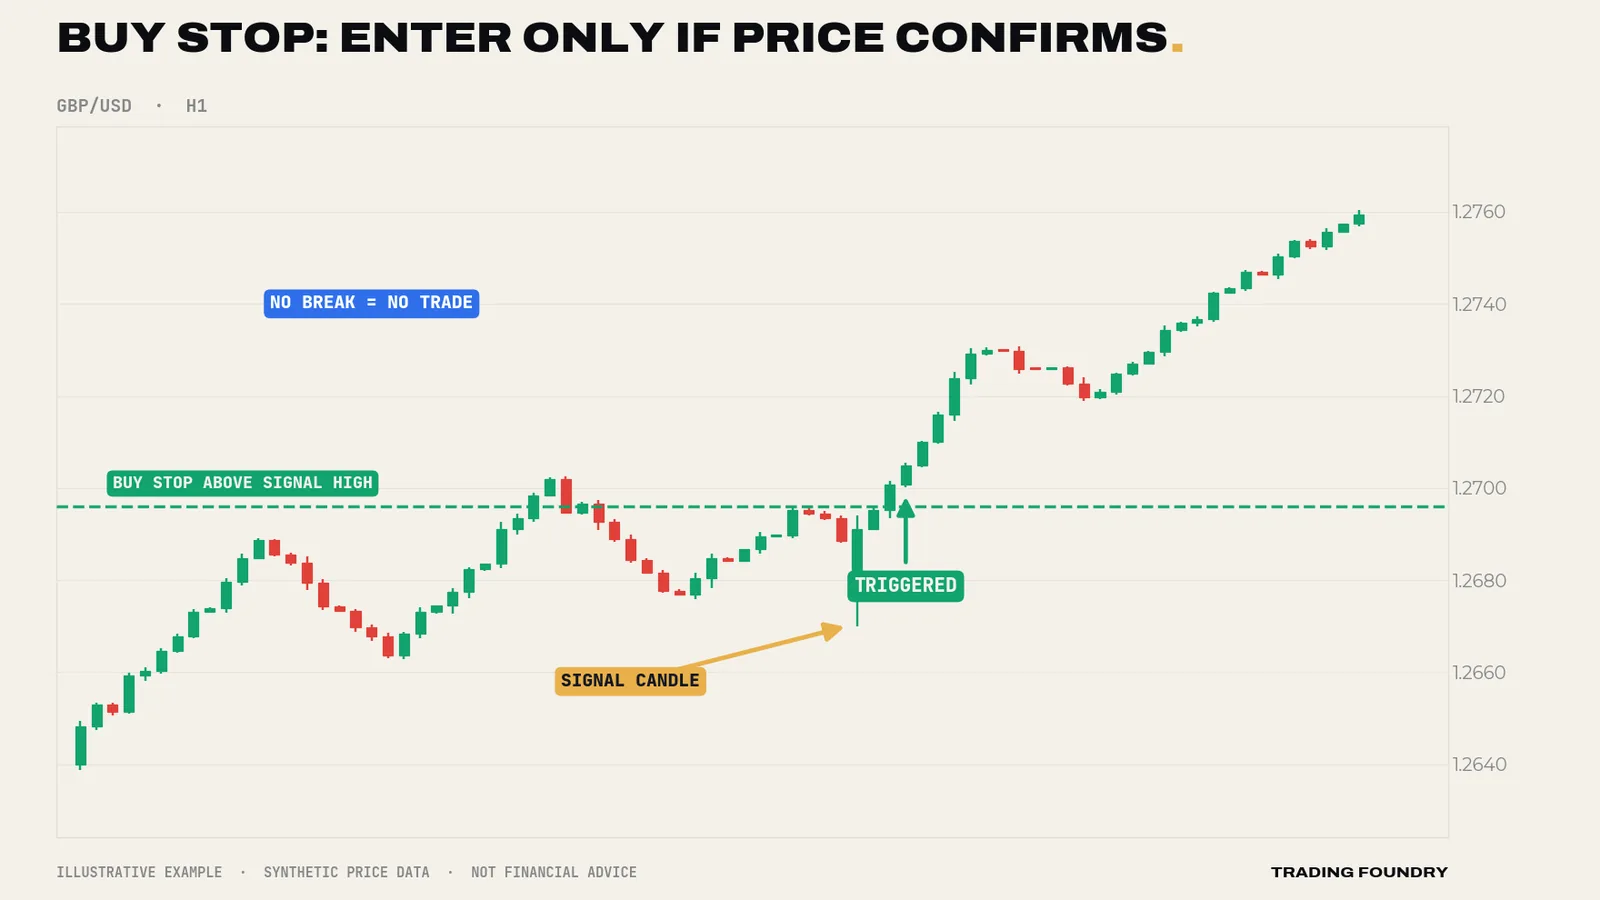
A stop order (as an entry, sometimes called a stop-entry or buy stop / sell stop) waits for price to move further in the direction you want, at a price worse than the current one.
- A buy stop sits above the current price. "Buy, but only if price rises to here."
- A sell stop sits below the current price. "Sell, but only if price falls to here."
Why pay a worse price? Because the stop order makes price prove itself first. If you want to buy only if price breaks above a candle's high, a buy stop just above that high does the job without you watching the screen. If price never gets there, you never get in — which is often exactly what you want.
The stop-loss: the order that keeps you in business
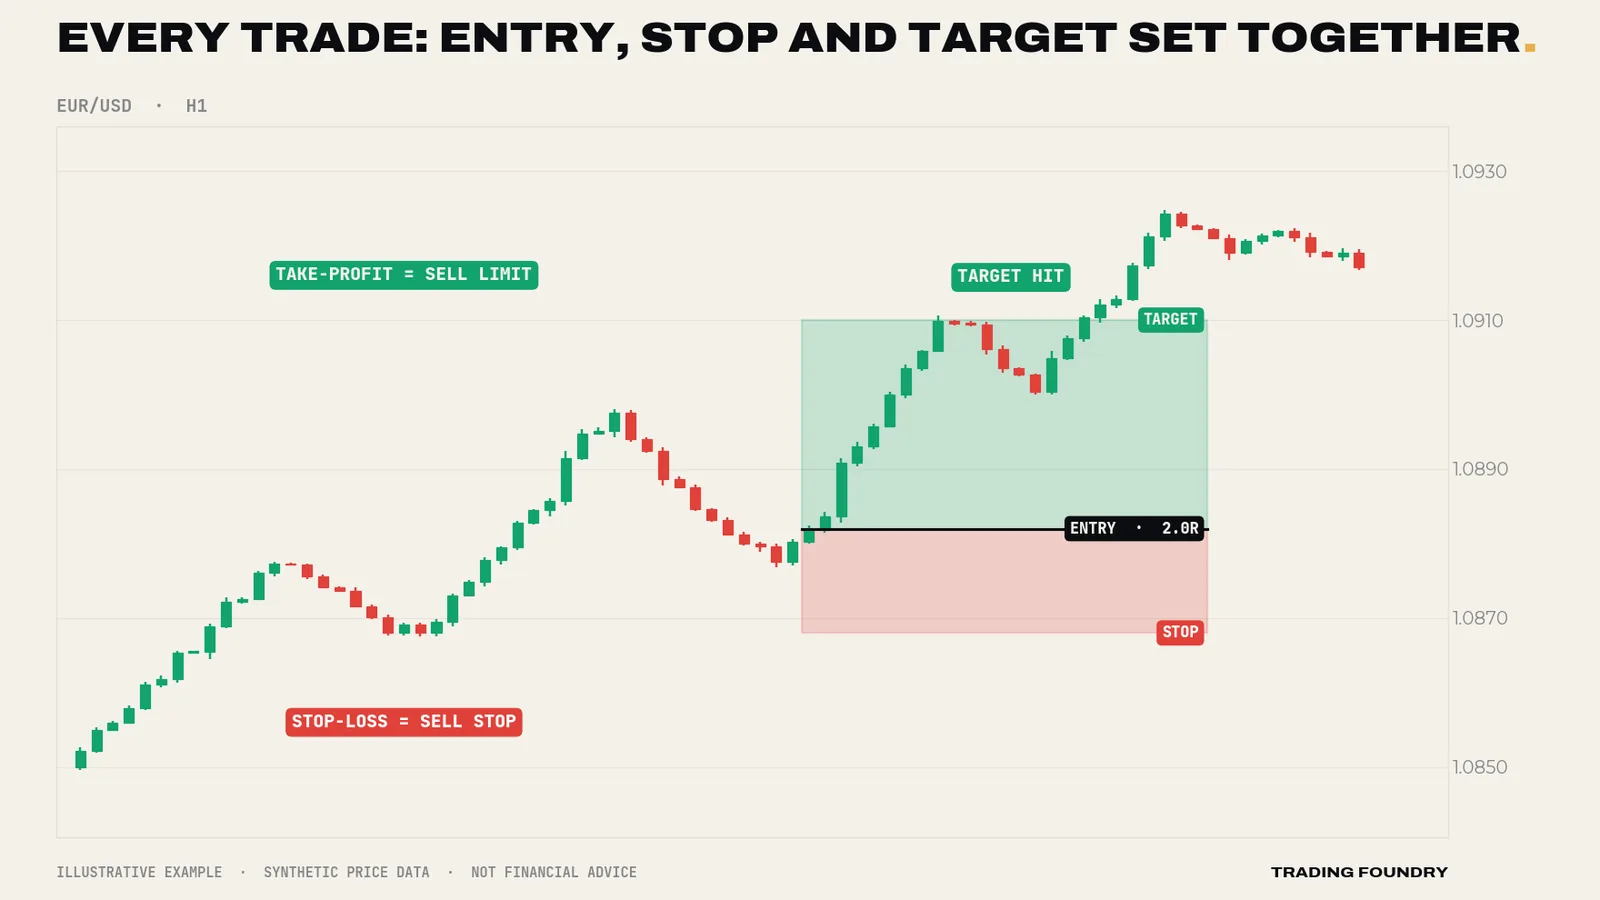
A stop-loss is an order attached to your open trade that closes it automatically if price reaches a set level against you. On a long trade it is a sell stop below entry; on a short, a buy stop above.
The stop-loss is not optional, not a sign of weakness and not something to "add later". It is the single order that turns an open-ended risk into a known one. This course's rule is absolute: the stop-loss is attached at the moment of entry, every time, at the level your analysis says the idea is wrong — beyond the zone and the signal candle's wick.
The take-profit: deciding the exit in advance
A take-profit is the mirror image: an order that closes the trade automatically when price reaches your target. A long trade's take-profit is a sell limit above entry; a short's is a buy limit below.
Placing it in advance has two benefits. You do not need to be watching when the target is reached. And you make the exit decision while calm, before greed and fear are involved.
When orders do not fill where you asked
A stop-loss is a stop order, and once triggered it becomes a market order. In normal conditions it fills at or very close to your level. In a fast market — a news release, a thin roll-over hour — or over a weekend gap, it can fill beyond your level.
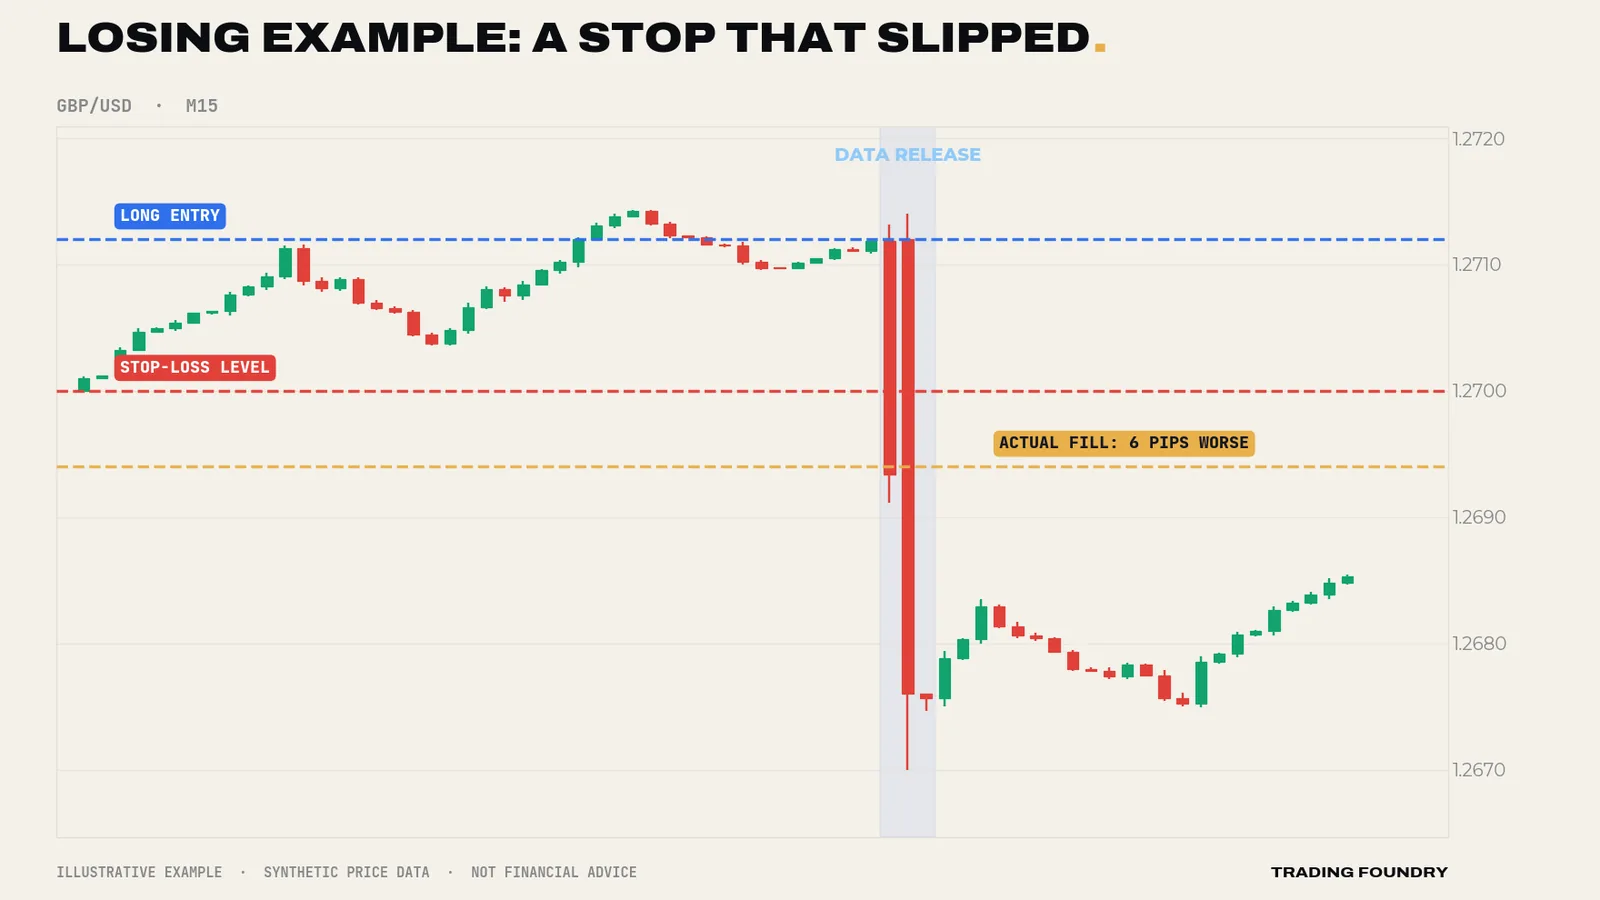
That is not a reason to avoid stops. A stop that slips 6 pips is infinitely better than no stop at all. It is a reason to avoid holding small-stopped positions into scheduled news, and to keep position sizes modest enough that occasional slippage is survivable.
Which order for which job
| Job | Order | Sits | Fills |
|---|---|---|---|
| Enter now | Market | — | Immediately, at best available price |
| Buy at a lower price | Buy limit | Below price | At your price or better, if reached |
| Sell at a higher price | Sell limit | Above price | At your price or better, if reached |
| Buy only on a break higher | Buy stop | Above price | Once triggered, at next available price |
| Sell only on a break lower | Sell stop | Below price | Once triggered, at next available price |
| Cap the loss | Stop-loss | Beyond your invalidation | Once triggered, at next available price |
| Bank the target | Take-profit | At your target | At your price or better |
A worked example of all three orders together. EUR/USD is in an H4 uptrend and an H1 bullish pin bar has just closed at a support zone: high 1.0886, low 1.0871. The plan:
- Entry: buy stop at 1.0888, two pips above the high. If price never trades above the pin bar, there is no trade.
- Stop-loss: sell stop at 1.0868, below the zone and the wick, 20 pips from entry.
- Take-profit: sell limit at 1.0928, 40 pips from entry — twice the risk.
All three are placed at the same time. Many platforms let you attach the stop-loss and take-profit to the pending entry order, so they activate automatically if it fills. Check that they have — a pending order with no attached stop is an accident waiting for a fast market.
Going deeper
Order duration. Pending orders have a time-in-force: "good till cancelled" (GTC) stays live until you remove it; "good for day" expires at the end of the trading day. Leaving a forgotten GTC buy stop live for a week is how traders discover they are in a trade they no longer want. Review pending orders every session.
OCO (one cancels other). Some platforms let you link two orders so that when one fills, the other is cancelled — for example, a buy stop above a range and a sell stop below it. Useful, but with a beginner's plan of one direction from the H4 trend, rarely necessary.
Trailing stops. A trailing stop follows price at a fixed distance as it moves in your favour, locking in profit. They sound ideal and often perform worse than expected in practice, because ordinary pullbacks hit them. Learn fixed stops and fixed targets first; experiment with trailing only once you have a journal to judge it against.
Entry choice changes results. A limit order at a zone gives a better price and a tighter stop but misses some trades; a stop order above a signal candle gets confirmation but a slightly worse price. Neither is right in general. This course's beginner plan uses a stop order above the signal candle, because confirmation keeps beginners out of trades where price never actually turns.
- Every trade has a stop-loss and take-profit attached at the moment of entry
- Stops move only in the trade's favour, or not at all
- Enter with a buy stop above (or sell stop below) the closed signal candle, not by chasing with a market order
- Cancel any pending order whose setup is no longer valid, and review pending orders every session
- Order type matches the plan: buy stop above / sell stop below the signal candle
- Stop-loss attached beyond the zone and wick, plus spread
- Take-profit attached at the planned target
- No high-impact news for either currency within 30 minutes
- Order duration set, and a reminder to review it
Summary
- Market orders fill now at the best available price, with possible slippage.
- Limit orders wait for a better price (buy below, sell above) and may not fill.
- Stop orders wait for confirmation at a worse price (buy above, sell below).
- Every trade carries a stop-loss and take-profit from the moment of entry.
- Stops can slip in fast markets and gaps, which is a reason to avoid news with tight stops — never a reason to trade without one.
Quick quiz.
Education only, not financial advice. Charts are illustrative training examples using synthetic price data, not real market history or results.